The second adventure of my #learningproject was much more new to me and I was much more unsure about how it would turn out. This week’s challenge was… a double layered chocolate cake with a hockey team logo in the middle for my human’s birthday.
Before this, I had never made a cake or icing from scratch so I was really just hoping it would taste sort of good and not kill anyone! I had this project in mind for a long time and it was actually one of the first things on my list when I wanted to make this my project. I had never made a layered cake before, and had watched them go horribly wrong on shows like Nailed It! so I was fully prepared for the worst to happen.

So I knew what I wanted to make but not a lot of knowledge on where to start so I hopped on over to Pinterest and searched for a “Home made Chocolate Cake Recipe” and started scrolling through the results. I checked out blogs and compared ingredients to see which recipes seemed to appeal to me. Eventually I settled here with a recipe for chocolate cake and also a recipe for chocolate buttercream icing! After settling on a recipe I was curious about what other kinds of icing I could use and why, I found this article about different types of icing that are commonly used in baking/decorating and what they are best used for. Based on my reading and limited skill level, I decided to make chocolate buttercream and vanilla buttercream. I knew from the baking shows I had seen on Netflix (Nailed It!, and Zumbo’s Just Desserts) that I could use dye to create the colours of icing I would use for my design. This decision sent me on a search for my vanilla buttercream recipe which can be found right here!
Now that I had decided on my approaches, I went through my recipes and created a shopping list. After I had the list off to the store I went! When the time came to start, I printed off both of my recipes and gathered my supplies. It quickly became apparent that my kitchen is NOT big enough!
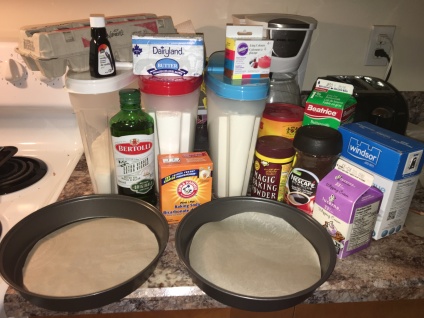
After I created this pile of ingredients, I put most of them away so I actually had room to, you know.. make the cake.
I started off with my pans, the recipe said to cut parchment paper in the bottom of the pan to help avoid sticking. On Nailed It! I also learned that greasing your pans with butter is the best way to get your cakes out of the pan in tact at the end. So I did both first, I greased the pans with butter as well as cut parchment paper for the bottom. The cakes were going pretty well so I popped them in the oven and set my timer. When I checked the cakes, the one was pretty much done and the other one was not even close and I kind of panicked. I noticed in my first task that one side of my oven seemed to get warmer than the other, so after I checked them I switched the one that was not as cooked to the warmer side and the more cooked one to the cooler side and all was well in a few minutes. (Problem Solving! 💡) Shortly after my cakes seemed done so I pulled them out and put them on the cooling rack so they could cool some before I (tried) to remove the cakes from the pans.
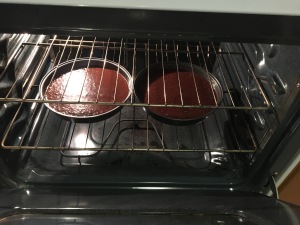
Cakes fresh in the oven!
If I backtrack just a little to when I put my cakes in the oven and set my timer, this is when I started making my chocolate buttercream icing! It seemed quite straightforward so I went off to work. A thing that I acknowledged at the beginning of this process (but I don’t think I wrote about) was that a lot of recipes suggest using a standing mixer for pretty much everything BUT standing mixers are insanely expensive and I am definitely not in a place to go buy one (My mom had an electric hand mixer that she was kind enough to let me use for this project). It is not that challenging to use a hand mixer but because some of my ingredients were thick and making a thicker icing OH MAN I was having a hard time controlling my bowl! It was most likely totally hilarious to watch because I almost flung my bowl off the counter multiple times before my wonderful boyfriend came and held the bowl for me while I was mixing so I didn’t have a total disaster on my hands.
(insert picture I forgot to take but I promise it was sort of hilarious here)
Take it back to my cooling cakes! While I was mixing away on my icing, the cakes continued to cool. After a bit I went to take them out of the pans and see if my butter/parchment paper combo did for sticking cakes. My boyfriend crowded in to see what happened (I made him watch the baking shows with me and so he was interested to see how it turned out) and I flipped the first cake! It fell perfectly out of the pan and onto my outstretched hand with the parchment paper firmly stuck to the bottom of my cake. Looking at the paper glued to the bottom of my cake, my heart sank a little bit because I was afraid to take it off. As the intensity grew, both of us went closer to the cake and I prepared to peel. I held my breath and lifted the edge and OH MY GOOOODNESS it was one of the most satisfying things I have ever done! It came off perfectly! So, I did the other cake too and it also worked out perfectly!
Now that my cakes were out of the pan and completely in-tact, I went back to my icing while the cakes cooled the rest of the way. By the time I finished my chocolate buttercream, my cakes were totally cooled. My cakes baked pretty flat because I didn’t fill them all the way full (thanks Netflix shows) so I didn’t have to cut the top off to make my cake flat. So I got to skip that step and go straight to putting my icing on my cakes! I started with icing the top of my bottom cake and then doing my best to line up the second one and just kind of dropped it (this link should take you to a GIF so hopefully I did that right) on top. It lined up pretty well and I have to say I was surprised, once I got over that, I iced the top of the top cake and finished up with all the way around the sides of both cakes! For my first time working with buttercream, I was pretty happy with it!
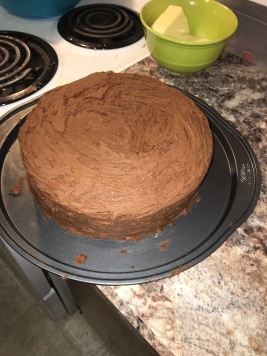
Icing on! Butter softening in the background
By now I am coming up to the home stretch: THE LOGO. I printed and cut out the Toronto Maple Leafs logo and placed it in the middle of the cake. I used a knife to outline the logo and removed the paper and filled up my piping bag with the vanilla buttercream and used the star shaped end to outline and fill in my maple leaf. I used blue icing dye and the left over vanilla icing to make blue icing and a small circle ending to pipe the outline of the leaf and write TML in the middle. It turned out alright or a first attempt and also considering I did no research or practice for decorating this week.
Overall, appearance wise, I was pretty happy with it! I was worried that it wouldn’t taste nearly as good as it looked but here is the finished product!
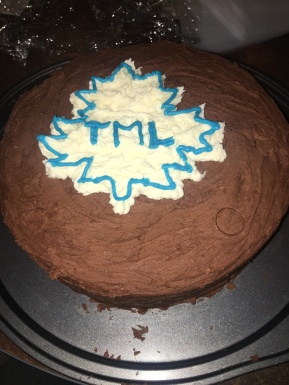
You can see some of the little circles from what I used to keep the saran wrap from sticking to the top while my icing dried.
So we were ready to cut the cake and taste it! This was the moment of truth to see if it tasted as good as it looked.( Ian insisted on taking a video of the cake cutting so you can watch that here if you so desire) Tasting time was upon us and after the first bite I wasn’t entirely sure how I felt… It was good but I wasn’t sure how good. So I put the tasting on to Ian and his sister who both gave really good reviews! By the next day when I had another piece of the cake I decided that I liked it and would use this recipe again.
Overall, I am really proud of how this turned out! There are definitely things I would change or pay more attention to but I am happy with the result!
I want to focus on the decorating side of things another week and learn how to properly decorate cakes and make them look prettier.
YAY! You made it to the end of this insanely long blog post! I hope you enjoyed my chocolate-filled adventure!
Something I want to comment on is my love and use of Pinterest. I have discussed this with a couple of people so I wanted to talk a little bit about it. When I am doing creative things (art, baking/cooking, crafts, etc.) I like to use Pinterest as my search engine. I use it sort of like I use Google, I use both of these things to help me connect with blogs and websites that discuss what I’m looking for help with. Sometimes I find photos, videos, writing, or all three.
That being said, I am ALWAYS super open to new ways to find things and I would LOVE to hear where you lovely humans find your favourite recipes and cooking tutorials!

Love the amount of detail in your post. Never was i wondering how you felt about your task or your level of success. Good use of pictures and formatting. Nice work!
LikeLike
Thanks Jonah!
LikeLike
That looks super yummy! Great job on the detail in the post! 🙂
LikeLiked by 1 person
I might have to make this myself.. looks so rich and moist! And not to worry – your post was a perfect length. I enjoyed all of the details, links, and pics.
LikeLiked by 1 person
Thank you! I had fun making the cake but also writing the post! I find if I am having fun it is probably more pleasant to read.
LikeLiked by 1 person
I think there is some truth to that theory!
LikeLiked by 1 person
Hi Brooklyn! This cake looks absolutely delicious! After reading through your blog post I love how you have added humor to your blogs, this makes for a very enjoyable read and allows your readers to connect and understand your personality! I also love to see the multiple hyperlinks and pictures you have added throughout your blog post! It made for an easy read and great recipes I can go try! Thanks for sharing keep up the great work!
LikeLiked by 1 person
Thank you Sydney! I am looking forward to my post for this week!
LikeLike
Brooklyn, as I was reading this, I could read it in my head exactly how you sound and talk because you used so much personality in your writing! Great job on the cake, looks soooo good and your post is awesome!
LikeLike
Thanks Mayt! That’s what I was kinda going for, I think it makes it more interesting to read and more fun to write!
LikeLike
Pingback: How have you contributed to the learning of others? | Maytlind Mallo
This cake looks super delicious and I love you Toronto Maple Leafs decoration on top! I really enjoyed how you took the reader through the step by step process of your baking and included pictures along the way! Also, Love the cute Harry Potter GIF!
LikeLiked by 1 person
Pingback: Things I Have Learned… Things I Have Made (Wk 11) | Educational Adventures